
.png)

Why We Migrated
Heroku is a great service that allows you to run a web app with minimal Dev Ops experience. It provides a number of easy to use add-ons and allows running your app in the cloud in a short amount of time.
We were on Heroku from November of 2021 until the end of December 2022 when we moved fully over to AWS. By around August 2022, it was becoming quite a challenge to operate on this platform we had grown to love! While we continued to scale our web and job servers under the Heroku system of dynos, the Postgres DB was increasingly choking on increased volume.
With limited memory our DB cache ratio was not in a good state and the DB started using Disk IO for queries, making queries significantly slower. The option was always there to increase the DB tier but with an additional cost that rose significantly with each tier, with quickly diminishing benefits. For example, by December 2022, we had bumped up our DB tier to “Premium-5” only two weeks after being on “Premium-4”! At this rate, we would potentially hit “Premium-9”, the highest you can go in Heroku without securing a long term contract with privately managed servers.
This became the main business driver for opting to AWS as the RDS provided by AWS could be configured with a higher number of connections, space, etc. However, we were certainly going to miss the handy heroku CLI and its quick results.
Similarly, we were seeing API calls that were erroring out with limited information. One such instance was that the API calls were taking longer than the default timeout of the Heorku Load Balancer (LB) and we couldn’t find the exact reason behind it (Heroku H18 error). The heroku logs did provide us the error codes but we were not able to figure out if it was related to Puma or the Heroku Load Balancer or something else. Switching to AWS would provide us the ability to pinpoint the root cause using ELB logs.
We were using another Heroku addon: papertrail for logging, alarming and performance measurement. However, papertrail wasn’t flexible enough with the query syntax, there was also no way to alert us if an event did not happen (count = 0). Some custom metrics had to be built with an expensive query over the DB, followed by a papertrail log event. AWS CloudWatch provided a more flexible alternative that would allow us to consolidate all of these system metrics. Having metrics through logs would significantly improve performance over our previous approach of having to query all the data through our logging service.
Autoscaling is quite easy in AWS with Cloudwatch and EC2 Auto Scaling.
Elastic Beanstalk was the service we looked into as it provided us the easiest way to move towards the AWS world. So it was time to start digging into the configs and the hooks to figure it out. 😅
Considerations During Migration
Our web app mostly comprises of the user facing APIs and the APIs used by our third party services for webhooks. Webhooks turn out to be the most used APIs with the numbers totalling out to around half a million per day. Due to this, we planned to migrate the web app in a couple of phases. The early part would be to migrate the third party webhooks, test it out as we’d have the ability to ask for data again if something would go wrong 🤞
For migrating the web app we considered the following:
- Ruby Version: EB had their own custom images for different platforms, and their default AMIs only supported 3.0.2. We initially decided to download and install ruby version 3.1.2 to each machine during runtime instead of building a custom AMI, which would take more time to set up.
- CI/CD Pipeline: For Heroku deployments, we used Github Actions for running our tests and deploying our app just like Heroku.
- Logging: Cloudwatch with gives us powerful query syntax, metrics, alarms and dashboards.
- Background Worker: Decided to keep using sidekiq..
- Scheduler: Heroku did not terminate one-off dynos launched from the Scheduler on code deployments, which was extremely helpful considering we’d have a few deployments daily! With AWS, while we used the Event Bridge Scheduler, we planned on using Sidekiq to handle any long running tasks for us. Sidekiq would push any interrupted jobs back in the queue and run them upon re-start.
- Database: Since we planned on using both the Heroku app and AWS EB app, we planned on using Heroku DB for the present and migrate to RDS in the future. Both the services being in the same region helped a lot here.
How We Migrated our Web App to Support Beanstalk
Create an application and the environment
Elastic Beanstalk provides us a couple of ways to start off the process. Their UI Console is the easiest way and then there’s always the CLI. The Elastic Beanstalk CLI is neat and easy to use. I’ll start through using the UI Console. Link for EB Cli Installation: https://docs.aws.amazon.com/elasticbeanstalk/latest/dg/eb-cli3-install.html
1. This part allows you create an application and have multiple environments set up. Generally we have the pattern of setting up a pre-prod environment where code is deployed through our CI/CD pipeline. The code is tested in the pre-prod env and then finally deployed over to the production environment.
2. Create an Environment Within the environment create the pre-prod or staging environment. Select the application from the All Applications and in the Actions button you can select Create Environment. Here you will have the ability to choose either the. Web Server Environment or the Worker Environment. Web Server Environment will allow the ability to make API calls from the public whereas this won’t be available for the Worker Environment. Worker Environment is to have long running tasks or background workers run here. We could’ve had sidekiq here but decided not to, something for the future maybe.
- After selecting the option from above you’ll have the ability to choose a domain which will allow you to access the APIs.
- Selecting the right platform is also essential during this phase. We used the latest version of Ruby and the Platform available here.
- To start off you can just use the Sample application provided by EB. Later on you can decide to configure EB CLI and have code uploaded through the CLI.
- Configure more options allows you to set up different configurations like the Environment Variables, Instance Types, Load Balancer settings, Database Options, etc. Selecting the default ones and testing it for your use case would be the best option. Also, here you’d have the ability to either select a custom VPC or use the default one. Doing nothing would create the environment under the default VPC.
- Once everything is configured go ahead and click Create Environment. This takes some time as it needs to create different resources like the Load Balancer, set up EC2s, Autoscaling Groups, Database, e.t.c.
3. Beanstalk Configurations AWS provides advanced configuration options and one of them is through .ebextensions. Through this, you can create an .ebextensions folder in the base of your source code and configure your environment and customize the resources necessary. The files can either be YAML or JSON. Some of the basic keys used are commands and container_commands. The commands run before the application and web server are set up and the application version file is extracted. Container commands run after the application and web server have been set up and the application version archive has been extracted, but before the application version is deployed
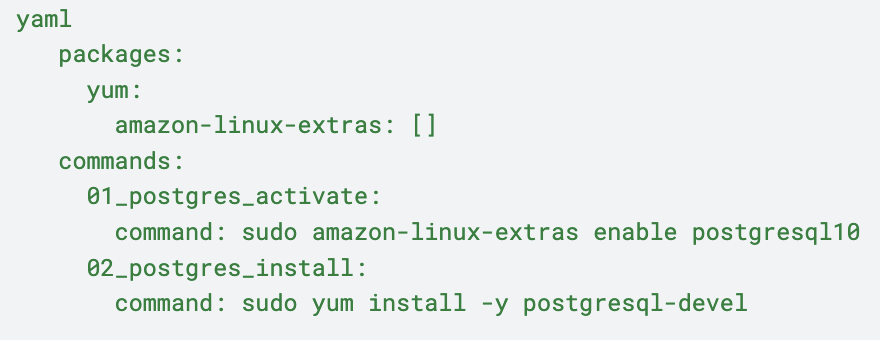
When setting up our application we added the following extensions: 1. Postgres was necessary to be setup otherwise one of our gems pg didn’t work. So, in order to install postgres we added the following config:
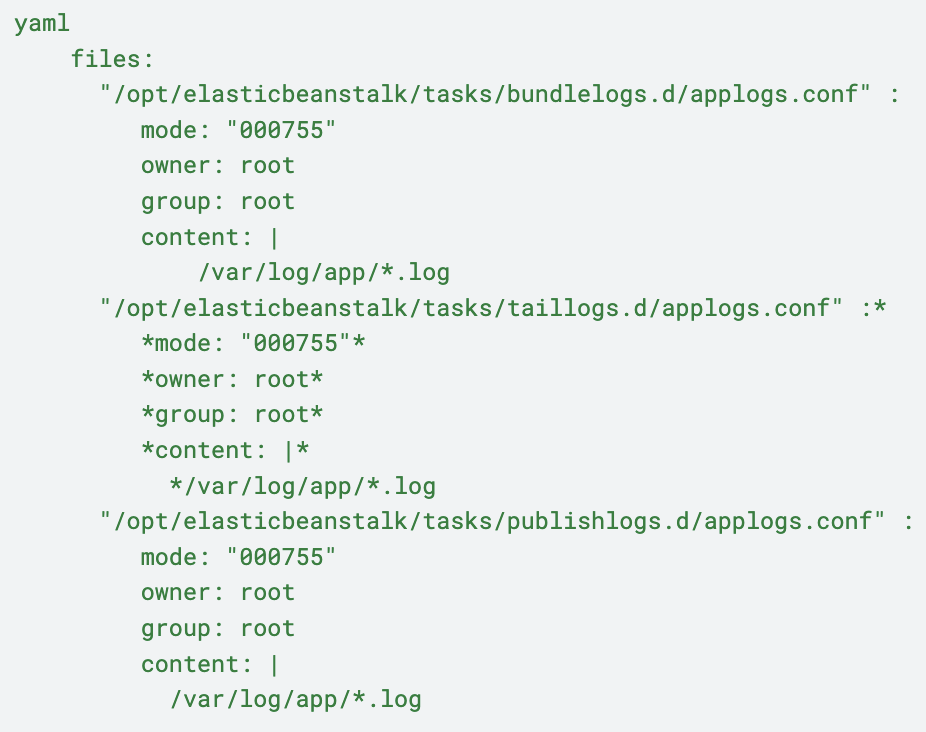
4. We set up our app to write logs in the directory `/var/log/app/` . In order to have those logs downloadable through the Elastic Beanstalk logs, we added the following config. Here the config files within `bundlelogs.d` directory allows logs to be bundled i.e. all the logs can downloaded. The config in the `taillogs.d` directory allows the last 100 lines of the logs to be downloaded. The logs in publishlogs.d allows publishing those logs to cloudwatch through the EB configuration.
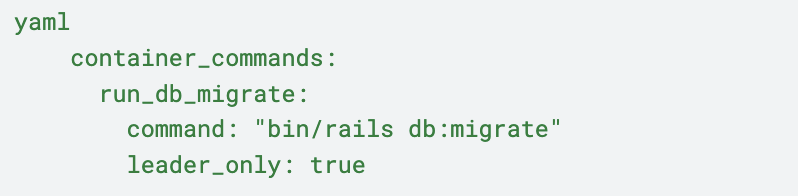
5. Since, in this hybrid environment, our Heroku deployment would run the db migration, we had to stop EB running the migration again. We tried using the default environment variable provided by Beanstalk i.e. `RAILS_SKIP_MIGRATIONS` to `false` but this didn’t work because we had disabled the `RAILS_SKIP_ASSET_COMPILATION`. Turns out both of these needed to be enabled for it to work. So, we added a custom script to run migrations:
6. We also added log rotation rules to take place every hour and old logs to be removed appropriately so that they do not consume more memory. Huge memory consumption due to logs was an issue when testing out a huge number of webhooks. This was because all the APIs were being made to the same EC2 instance and logs were overrunning the disk space.
7. Platform Hooks Platform hooks are designed to extend the environment’s platform. These are custom scripts and executable files that get deployed as part of the source code and these are executed during various stages of the application lifecycle.
- Hooks: These are added to the .platform/hooks folder and are executed during the app deployment. The following directories allow the executable files to be executed at different stagies.
- prebuild: Files here run after the EB engine downloads and extracts the source bundle before it sets up and configures the app and web server.
- We added one file for ruby installation. This was later removed after we created our own custom AMI.
- Another one we added was for secrets key download. We added our secrets to Secrets Manager and one of those secrets was the production/staging.key , we download this one through prebuild hook and stored it in the location rails required it to i.e. config/credentials/staging.key
- Our app was to be deployed to Heroku and AWS at the same time and it required two different puma configurations. We replaced the heroku based Procfile by our AWS based procfile during this phase.
- predeploy: Files here run after the EB engine sets up and configures the app and we server and before it deploys them to their final runtime location.
- During this phase we stopped sidekiq. We added a custom script to send the SIGTERM signal to sidekiq processes and wait for them to exit. This way the jobs that were shut down would be re-processed when the sidekiq worker started again. This was done during this phase so that the sidekiq process would use the new code whenever we deployed one.
- postdeploy: Files here run after the EB engine deploys the app and proxy server(nginx).
- Here, the sidekiq worker stopped during the predeploy was started again using the new source code.
8. Platform Config Hooks: These have the same structure as the .platform/hooks but reside in the directory .platform/confighooks and the executables within this directory run whenever only configuration changes are made. i.e. Environment Variable changes, etc. When initially testing this was not set up and we saw that when config changes were made, logs were not streaming properly, sidekiq jobs were not making use of the new config. Hence, the changes.
- prebuild : We set up secret keys and replaced Procfile during this phase similar to the hooks above.
- predeploy : Similar to the hooks above, we stopped sidekiq workers here.
- postdeploy : Similar to the hooks above, we restarted the sidekiq workers here.
9. Nginx Config:
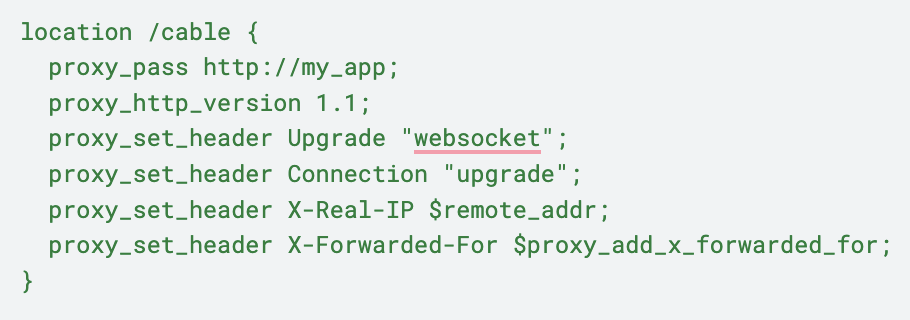
Another thing that was different from heroku was the proxy server. Requests were proxied from AWS ELB (Elastic Load Balancer) to Puma through nginx. For most of the cases, the default nginx configuration worked like a charm. We faced a hurdle when setting up action cable. We required nginx to set a few headers and use the http_version 1.1 and it worked as expected.
10. AWS Cloudwatch Unified Agent
When starting the migration we opted for the older awslogs streaming agent. This provided an easy way to stream logs but when using this agent we had a weird issue. Every day our server would crash at random times and we were unsure what was causing this. Looking into the memory intensive processes we found out that awslogs was the culprit. The reason behind this we believe is that due to log rotation. The agent probably missed out on the last line it previously streamed to Cloudwatch and it started checking the whole file for the missing line causing the memory leak. After figuring out the memory leak, we decided to move to the new unified agent provided by cloudwatch. Also, this provided us the ability to stream memory related details from our EC2s to Cloudwatch, which was a must as we sometimes faced memory leaks in our app as we started running long running tasks in our sidekiq workers in place of the HerokuScheduler . Using the unified agent solved the mystery of the memory leak and streaming logs have been a breeze since the upgrade! Unified Agent Link: https://docs.aws.amazon.com/AmazonCloudWatch/latest/monitoring/Install-CloudWatch-Agent.html
11. Amazon Machine Images
Creating a custom AMI was one of the enhancements we did to improve deployment times in the newly registered EC2 instances. The default Beanstalk AMI for Ruby had the ruby version 3.0.2 but we used 3.1.*. Downloading of ruby during the EC2 initialization required 6-7 minutes which was a lot with the full deployment time totaling to around 8-10 minutes. To avoid that, we created an AMI with the required ruby version and a few other dependencies like postgres, etc. When creating the AMI, we used the base image as the one Beanstalk used for deployment to instances. This reduced the deployment time to 3-4 minutes which was a big improvement over the 8-10 minutes it took earlier. Link https://docs.aws.amazon.com/elasticbeanstalk/latest/dg/using-features.customenv.html
We Migrated in Steps
Once the beanstalk environment was set up and tested to work as we wanted it to, we started our web servers in both the platforms i.e. Heroku and AWS. However, we separated our domains. We then started migrating a few of our webhooks over to the new world and started monitoring them with good results. We set up auto scaling rules and were pretty excited to see them in action during our peak hours. Finally we decided to move all our webhooks to AWS after setting up a number of alarms which could notify us if something was wrong or some webhooks were not firing up.
Now that the webhooks were all running in AWS, the challenge ahead was to move over the rest of the traffic from Heroku to AWS. This was tricky because there were a lot of moving pieces, we used redis, sidekiq, and third party services. One major change was the use of Rails secrets as opposed to Heroku Environment Variables. We started moving over all our secrets to the credentials.yml. Once done, we started pointing our user-facing APIs to AWS. These worked for most of the cases and blew up for a few due to missing secrets. But for the most part it happened with few side effects and finally we migrated all our APIs to AWS from Heroku.
ince we had a mobile app, instead of a web app, we were able to push a new mobile app that hit the new domain, keeping the Heroku domain alive, while we watched the traffic dwindle as users upgraded to the new app (Users still using the old app would hit Heroku). We could then expand the AWS fleetslowly, allowing us to scale and adjust as we went.
Have We Seen Improvements from the Migration?
After migration of our app to AWS we have seen a lot of improvements.
After the upgrade, we now have:
- Proper autoscaling rules to have our servers autoscale based on the resources necessary.
- We also have a dashboard we use extensively to check if our application is performing as expected.
- We started monitoring our ELB logs, which has been a fruitful upgrade.
- Logs can now be easily queried with a much versatile query language provided by Cloudwatch.
- Metrics are the cloudwatch feature we love the most, any logs can be converted to a metric and can be used used to set alarms, autoscale, send message to Lambdas through SNS topics, providing us with a lot of flexibility into what we can do.


.png)